jkr

Friday, December 11, 2009

உங்கள் பிளாக்குகளுக்கு டிராபிக்கை பெருக்க பல வழிகள்

பிளாக் ஆரம்பித்து முப்பதிற்கும் அதிகமான இடுகைகள் போட்டு விட்டேன். இது ஒரு குறுகிய காலம்தான். அதிகபட்சமாக 3 இடுகைகள் ஒரே நாளில் போட்டு இருக்கிறேன். அந்த நாளில் அதிகபட்சமாக 2000 ஹிட்ஸ் கிடைத்து இருக்கிறது. மொத்தம் 25,000 மேல் ஹிட்டுகள் கிடைத்து உள்ளன. எனக்கு ட்ராபிக் வந்த வழிமுறைகளை வைத்து சில தகவல்களை தருகிறேன்.

என் பிளாக்குக்கு டிராபிக் பெறுவதற்காக நான் தேர்ந்தெடுத்த இணையதளங்கள் தமிழ்மணம், தமிழிஷ் , தட்ஸ்தமிழ் புக்மார்க் .
தமிழர்ஸ்,தமிழ்10 , பிளாக்கின் இடுகைகளை தானாகவே இணைத்து கொண்ட தளங்கள் யூத்புல்விகடன் , திரட்டி.

தமிழிஷில் இடுகைகளை வாசித்து கொண்டிருந்த எனக்கு, தமிழ் பிளாக் உலகில் முதன்மையான பிளாக்காக உள்ள பிகேபி அவர்கள் பதிவு, அதிரடியாக தகவல்களை அள்ளி தெளித்து எழுதும் தமிழ்நெஞ்சம், இடுகைகளில் படங்கள் அதிகமாக போட்டு விளக்கமாக எழுதும் சுபாஷ் போன்றோரை பார்த்து பதிவு எழுத ஆவல் எழுந்தது உண்மை. பிகேபி அவர்கள் பதிவு அதிக வரவேற்பை பெற்று இருந்தாலும் தமிழில் தொழில் நுட்ப பிளாக்குகள் குறைவாகவே உள்ளன. நாம் முயற்சிக்கலாம் என்று ஆரம்பித்த இந்த பதிவு எனக்கு திருப்திகரமாகவே உள்ளது.

எனக்கு டிராபிக் அளித்த தளங்கள் பற்றி பார்ப்போம்.

தமிழிஷ்.காம் : தமிழிஷில் எப்போதும் தொழிநுட்ப இடுகைகளுக்கு வரவேற்பு அதிகம். எனது இடுகைகள் அதிக பார்வையாளர்களை தமிழிஷில் இருந்து பெற்றன. பெரும்பாலான பதிவுகள் குறிப்பிடத்தக்க அளவில் ஓட்டுகள் பெற்றன. இங்கிருந்து வருபவர்கள் பதிவுலகிற்கு புதியவர்கள் என்பதால் பின்னூட்டம் இட தயங்குவார்கள். தமிழிஷ் பெரும்பாலும் அனைவரும் அறிந்திருப்பீர்கள். அறியாதவர்கள் இந்த லிங்க் மூலம் உறுப்பினர் கணக்கு உருவாக்கி கொண்டு இந்த லிங்க் மூலம் உங்கள் இடுகைகளை பகிருங்கள் . புதிய பார்வையாளர்கள் அதிகம் கிடைப்பார்கள்.

தமிழ்மணம்.நெட் : பிரபல திரட்டியான தமிழ்மணம் பதிவர்களின் தாய்வீடு எனலாம். பதிவுலகில் ஆரம்பத்தில் இருந்து பதிவெழுதும் பதிவர்கள் அனைவரும் இங்குதான் இருப்பார்கள். அதிக ஹிட்ஸ் கிடைக்கும். புதிய பதிவர்களுக்கான ஊக்க மருந்தான பின்னூட்டங்களை பெறவேண்டும் என்றால் கண்டிப்பாக தமிழ்மணத்தில் பகிரவேண்டும். சக பதிவர்கள்/ பிரபல பதிவர்கள் பின்னூட்டங்கள் மூலம் ஊக்குவித்து வழிநடத்த தவறுவதில்லை. இங்கு பகிர்ந்த பிறகுதான் எனக்கு அதிகம் பின்னூடங்கள் வந்தன. நல்ல அறிமுகங்கள் கிடைக்கும்.

இதனையும் பெரும்பாலானோர் அறிந்திருப்பீர்கள். அறியாதவர்கள் இந்தலிங்க்கை உபயோகித்து உங்கள் பதிவுகளை இணைக்க தமிழ்மணத்திடம் அனுமதி பெற்று பின்பு பதிவுகளை தொடர்ச்சியாக இணைக்கலாம். அனுமதி பெறுவதற்கு நீங்கள் உங்கள் பிளாக்கில் குறைந்த பட்சம் 3 இடுகைகளாவது தமிழில் எழுதி இருக்க வேண்டும்.

தட்ஸ்தமிழ்.காம் : நான் இந்த இடுகை எழுத காரணமாக இருந்ததே இந்த தளம்தான். தட்ஸ்தமிழ் என்பது பிரபல செய்தித்தளம் என்பதை அனைவரும் அறிந்திருப்போம். தட்ஸ்தமிழ் பதிவர்கள் இடுகைகளை பகிர வாய்ப்பு ஏற்படுத்தி தருகிறது என்பதை பெரும்பாலானோர் அறிந்திருக்க வாய்ப்பு இல்லை. தட்ஸ்தமிழ் புக்மார்க்ஸ். எனக்கு எதிர்பாராத அளவு அதிகமான புதிய பார்வையாளர்களை அனுப்பியதில் இந்த தளத்துக்கும் முக்கிய பங்கு உண்டு. ஆனால் வருத்தமான கருத்து என்னவெனில் பெரும்பாலான பதிவர்கள் அங்கு இடுகைகளை பகிர்வதில்லை. குறைந்த அளவிலேயே இடுகைகள் உள்ளன. இந்த பிளாக்குக்கு வந்துள்ள பல அனானி பின்னூட்டங்கள் இங்கிருந்து வந்தவர்களிடம் இருந்துதான்.

இதில் இடுகைகளை பகிர்வது தமிழிஷ் போன்றதுதான். எளிதான முறைதான். இந்த லிங்க்கை உபயோகித்து உறுப்பினர் கணக்கை உருவாக்கி கொண்டு இந்த லிங்க் மூலம் இடுகைகளை பகிருங்கள். நல்ல டிராபிக் எதிர்பார்க்கலாம்.

ஆனால் இதில் பின்னடைவானது என்னவெனில் அனானியாக யார் வேண்டுமானாலும் ஓட்டு போட்டு கொள்ளலாம். டைனமிக் ஐப்பி வசதி உள்ளவர்கள் தங்கள் இடுகைகளுக்கு தாங்களே அதிக ஒட்டு போட்டு கொள்ள முடிகிறது. இந்த தளம் ஆரம்ப நிலை என்பதால் போக போக மேம்படுத்துவார்கள் என்று நம்புவோம்.

யூத்புல் விகடன்.காம் : பிரபல விகடன் குழுமத்தின் இளைஞர்களுக்கான இணையதளமான இதில் அவர்களே இடுகைகளை தேர்வு செய்து பதிவர்களை ஊக்குவிக்கிறார்கள். எனது இரண்டு இடுகைகளை குட் பிளாக்காக இணைத்து இருந்தார்கள். இப்போது என் எந்த இடுகையும் இணைக்கபடுவதில்லை. :( . டிராபிக் கை பொறுத்தவரை மிக அதிகமாக இல்லை என்றாலும் குறிப்பிட்ட அளவு வந்து கொண்டு இருக்கிறது. எப்போதோ இணைக்கப்பட்ட எனது இரண்டு இடுகைகளுக்கு இன்னும் தினம் 25 ஹிட்ஸ் கிடைக்கிறது. அவர்கள் இணைத்துள்ள பிளாக்குகளை இந்த லின்க்கில் காணலாம் . உங்கள் பிளாக்குகள் இடம் பெற வேண்டும் என்றால் youthful@vikatan.com என்ற முகவரிக்கு மின்னஞ்சல் செய்யவும்.

திரட்டி.காம் : இங்கு என் இடுகைகள் தானாக இணைக்கப்பட்டன. பதிவுகள் போடும் நாட்களில் பத்து ஹிட்டுகள் உத்திரவாதம்.

தவிர மற்ற தளங்களை நான் உபயோகித்து பார்த்ததில்லை. பார்த்து விட்டு கவரும் பட்சத்தில் பின்பு எழுதுகிறேன்.

தமிழிஷ், தமிழ்மணம் போன்றவற்றில் பகிர்ந்து வருவோர் புதிய வரவுகளான தட்ஸ்தமிழ் புக்மார்க், யூத்புல் விகடன் போன்றவற்றிலும் பகிருங்கள். இவர்களை போன்ற பிரபல தளங்கள் பதிவுலகுக்கு வரும் போது ஆதரவு தருவது நம் கடமை. அவர்கள் மேலும் பல வசதிகள் தர உற்சாகமாய் இருக்கும். அப்போது தான் தினமலர், நக்கீரன் போன்ற மற்ற பிரபல தளங்களும் பதிவுலகில் கால் வைக்கும். பதிவுலகம் வளரும்.

எனக்கு தெரிந்தவற்றை வைத்து இந்த இடுகையை எழுதி உள்ளேன். தவறுகள் இருந்தால் சுட்டி காட்டவும். ஒரு சிலருக்காவது உபயோகமாக இருந்தால் மகிழ்வேன்.

ஆக்கம்:டிவிஎஸ்50
http://tvs50.blogspot.com

பிளாக்கின் வாசகர்களை அதிகரிக்க, நிரந்தரமாக்க

பதிவுலகில் வலைப்பதிவு எழுதுவோர் ஒவ்வொருவருக்கும் தனி காரணம் உண்டு. சிலர் பொழுதுபோக்கிற்காக எழுதுவோர். சிலர் தன் வாழ்வின் தடயங்களை பதிய எழுதுகின்றனர். சமூகம் குறித்தும், திரைத்துறை குறித்தும் தங்கள் பார்வையை பதிவிடுகிறார்கள். என் போன்று சில பதிவர்கள் கற்று கொண்ட விசயங்களை மற்றவர்களுடன் பகிர்வதற்காக வலைப்பதிவை உபயோகித்து வருகிறோம்.

ஒவ்வொரு வலைப்பதிவுக்கும் அவரவர் விருப்பம் சார்ந்து வாசகர் வட்டம் உண்டு. தொடர்ந்து அந்த வலைப்பதிவை வாசித்து வருவார்கள். நமது வலைப்பதிவுக்கு தினசரி புது வாசகர்கள் திரட்டிகள் மூலமாகவோ, நண்பர்கள் மூலமாகவோ வருகிறார்கள். வருபவர்கள் தொடர்ச்சியாக நம் வலைப்பதிவுக்கு மீண்டும் வருவார்கள் என்று உறுதி கூற முடியாது.

தமிழ் வலைப்பதிவுகளில் வருமானத்திற்கு வழி குறைவு என்பதால் வலைப்பதிவு எழுதுவதை யாரும் முழு நேர தொழிலாக செய்வதில்லை. நேரம் கிடைக்கும் போது எழுதுகிறார்கள். வலைப்பதிவை வாசிக்க வாசகர்கள் தினசரி வரும் போது புது பதிவு இல்லை என்றால் வருபவர்கள் அதிருப்தி கொள்கின்றனர். மீண்டும் அந்த வலைப்பதிவுக்கு வருவதை குறைத்து கொள்கின்றனர். கொஞ்சம் கொஞ்சமாக குறைந்து கடைசியில் ஒன்றுமில்லாமல் ஆகிவிடும். மீண்டும் திரட்டிகளில் கண்ணில் தென்பட்டால்தான் வருகிறார்கள்.

தினமும் பதிவு எழுதுவது இயலாத காரியம்தான். இந்த சூழ்நிலையில் நம் வலைப்பதிவுக்கு வரும் வாசகர்களை தக்க வைத்து கொள்வது முக்கியம். அதற்கு சில வசதிகள் உள்ளன. RSS Feeds , Follower என்ற வசதிகள் அவை.Follower வசதி வலைப்பதிவு வைத்து உள்ளவர்களுக்கு மிகவும் உதவியாக இருக்கும். இது குறித்து மற்றொரு இடுகையில் விரிவாக பார்க்கலாம்.

இப்போது RSS Feeds பற்றி பார்ப்போம். RSS Feeds பார்வையாளர்களுக்கு எந்த அளவில் உபயோகமாக இருக்கும் என்பதை ஏற்கனவே RSS செய்தியோடையின் முக்கியத்துவம், மகத்துவம் என்ற இடுகையில் விரிவாக எழுதி இருந்தேன்.

வலைப்பதிவு வைத்து இருக்கும் நாம், பார்வையாளர்களுக்கு RSS Feeds வசதிகள் அளிப்பது நமக்கு எந்த அளவில் உபயோகப்படும் என்று பார்ப்போம். நான் முன்னர் கூறி உள்ளபடி நமது வலைப்பதிவுக்கு வரும் புதிய வாசகர்களை நம் பதிவின் நிரந்தர வாசகராக மாற்றுவது இருவருக்கும் நன்மை பயக்கும். அதற்கான வசதிதான் RSS Feeds.

நாம் புதிய இடுகைகள் இடும் போது வாசகர் உபயோகிக்கும் Feed Reader ல் நமது புதிய இடுகைகள் புதுப்பிக்கப்பட்டு விடும். அவர் உங்கள் எழுத்துக்களை எளிய முறையில் தொடர்ச்சியாக வாசித்து கொள்வார்.

பிளாகரில் (blogger.com) வலைப்பதிவு வைத்து இருப்பவர்களுக்கு அவர்கள் வலைப்பதிவின் RSS Feeds URL பொதுவாக இப்படி இருக்கும். http://YOURBLOGNAME.blogspot.com/feeds/posts/default/ . இதனை Feed Reader -ல் இணைப்பதன் மூலம் இடுகைகளை வாசித்து கொள்ள முடியும்.

Feed Reader உபயோகிப்பதற்கு ஓரளவாவது இணையம் சார்ந்த அறிவு வேண்டும். அவர்கள் பிளாக்கர் அளிக்கும் இந்த RSS வசதியை உபயோகித்து கொள்வார்கள். ஆனால் புதியவர்கள் சிலர் ஈமெயில் மட்டும் உபயோகிக்க தெரிந்தவர்களாக இருக்கிறார்கள். அவர்களுக்கு RSS Feed , Reader என்பன குழப்பத்தை தரலாம். அவர்களுக்கும் உங்கள் எழுத்துகளை கொண்டு சென்று சேர்க்க வசதி உள்ளது.

RSS Feeds பொறுத்தவரை FeedBurner.com தளம் மேம்படுத்தப்பட்ட வசதிகளை அளிக்கிறது. பிரபலமான அந்த தளம் கூகிள் நிறுவனத்தால் வாங்கப்பட்டு மேலும் பிரபலமாகி உள்ளது.

Feedburner.com சென்று கூகிள் கணக்கு மூலம் லாகின் செய்து கொள்ளுங்கள். அங்கு உங்கள் பிளாக்கின் URL கொடுத்து புதிய RSS Feed உருவாக்கி கொள்ளுங்கள்.
அங்கு கேட்கப்படும் தகவல்களை அளிக்கும் போது உங்களுக்கு புதிய RSS Feed முகவரியை அளிக்கும். உதாரணத்திற்கு இப்படி இருக்கும். http://feeds.feedburner.com/tvs50posts .


இதனை உங்கள் வலைப்பதிவின் நிரந்தரமான RSS Feed URL ஆக மாற்ற வேண்டும். இதற்கு உங்கள் பிளாக்கர் Dashboard -ல் Settings --> Site Feed --> Post Feed Direct URL என்பதில் உங்கள் புதிய Feedburner RSS Feed Url அளித்து சேமிக்கவும். இனி உங்கள் வலைப்பதிவுக்கான RSS Feeds வசதியை FeedBurner கவனித்து கொள்ளும்.


இதில் முக்கிய வசதியான ஈமெயில் மூலம் சந்தாதாரர் (Subscribe) பற்றி பார்க்கலாம். மற்ற வசதிகளை பற்றி பின்பு தனி இடுகைகளாக எழுதுகிறேன்.
ஈமெயில் சந்தாதாரர் வசதியை பெற Feedburner சென்று Publicize --> Email Subscriptions கிளிக் செய்து ஆக்டிவேட் செய்யவும்.
சந்தாதாரர் வசதி அளிப்பதற்கு Code கொடுப்பார்கள். அதை உங்கள் வலைப்பதிவில் வேண்டுமென்ற இடத்தில் பேஸ்ட் செய்தால் போதுமானது. அல்லது பிளாக்கரில் எளிதாக இணைக்கும் வசதியையும் கொடுத்து உள்ளார்கள். அதனை உபயோக படுத்துங்கள். அங்கே Feed Count என்ற வசதியும் உண்டு. அதன் மூலம் உங்கள் வலைப்பதிவை தினமும் எத்தனை பேர் RSS Feeds மூலம் படிக்கிறார்கள் என்பதனை உங்கள் வலைப்பதிவில் காட்டலாம்.

பிளாக்கரில் Feedburner உபயோகப்படுத்துவது குறித்த இந்த செய்முறை வீடியோ கொஞ்சம் வளா வளா என்று இருந்தாலும் புரியும் படி உள்ளது. பார்க்கவும்.


இனி உங்கள் வலைப்பதிவில் வாசகர்கள் ஈமெயில் மூலமும் சந்தாதாரர் ஆகி கொள்ளலாம். நீங்கள் இடும் புதிய இடுகைகள் சந்தாதாரரை ஈமெயில் மூலம் சென்றடைந்து விடும். அவர் உங்கள் தளத்துக்கு வர தேவை இல்லை. உங்கள் பார்வையாளர்களை RSS Feeds உபயோகிக்க ஊக்கப்படுத்துங்கள். இந்த எளிய முறை மூலம் உங்கள் வாசகர்கள் பெருகி கொண்டு செல்வார்கள்.
இப்போதெல்லாம் வைரஸ் போன்ற பிரச்சினைகளால் வலைப்பதிவுகள் காணாமல் போகின்றன. மேலும் சிலர் பதிவு எழுதுவதை சில காலம் நிறுத்தி விட்டு மீண்டும் துவங்குகிறார்கள். நீங்கள் பதிவு எழுதுவதை நிறுத்தி விட்டு ஒரு வருடம் கழித்து மீண்டும் எழுதினாலும் நீங்கள் தக்க வைத்து கொண்டுள்ள வாசகர்களுக்கு உங்கள் படைப்புகளை கொண்டு செல்ல முடியும்.

அல்லது புதிய வலைப்பதிவு எழுதினாலும் Edit Feed Details மூலம் புதிய Feed மாற்றி அளித்து அங்கும் இவர்களுக்கு நம் படைப்புகள் கொண்டு செய்ய வைக்க முடியும். இது போன்ற வசதிகள் நம் வாசகர்களை இழக்காமல் வைத்து கொள்ள உதவும்.

இதன் மூலம் வாசகர்கள் பெருகும் போது நாம் எழுதுவதை நம்மால் எடை போட்டு கொள்ள முடியும். அதிகரித்தால் துணிச்சலாக எழுதலாம் :) . எழுதும் போதும் நம்மை நம்பி சந்தாதாரர் ஆகி உள்ளவர்களுக்காக எழுதுகிறோம் என்று உற்சாகம் பிறக்கும்.

RSS Feed வசதி அளிப்பதால் வாசகர்கள் நம் தளத்திற்கு வர மாட்டார்கள். Feed Reader , ஈமெயில் மூலம் வாசித்து இருந்து விடுவார்கள் என்ற தவறான குற்றசாட்டு உண்டு. தளத்திற்கு வந்து படிப்பவர்களை இது பாதிப்பதில்லை. ஒன்றுமில்லாமல் போவதற்கு பதில் குறிப்பிட்ட எண்ணிக்கையில் வாசகர்களையாவது கையில் வைத்து கொள்ளலாமே. Feedburner உங்கள் வாசகர் வட்டத்தை அதிகப்படுத்தும். கண்டிப்பாக உபயோகியுங்கள்.

டிவிஎஸ்50
http://tvs50.blogspot.com

How to Configure and Use Google Public DNS

As of part of making web faster, today Google has introduced a new public DNS resolver called Google Public DNS. Domain Name System or in short DNS name servers can be simply said as a service which translates domain names into IP addresses. We don’t even notice as this service is often handled automatically by our ISP. So how to configure and use Google public DNS instead of your default DNS servers and what’s the use.

google dns opendns vs Google public dns

Normally your network setting might be using the DNS provided by your ISP or using OpenDNS facility. In the former case, the IP addresses used by your ISP's domain name servers are automatically set by your ISP via the Dynamic Host Configuration Protocol (DHCP). So we don’t need to care about this thing until some bad happens with their dns servers. According to Google, the advantage of using Google public dns is that, it offers more speed and is much more secure. And more often you will not see a crappy redirection of invalid sites to opendns search page or your isp’s site with full of ads.

Checkout their Public DNS page.

How to Use Google Public DNS

Change Default DNS server settings to Google Public DNS in Windows

google public dns changing steps

Go the Control Panel.

  1. Go to Network and Sharing Center, then Manage network connections.
  2. Choose the internet connection for which you want to configure Google Public DNS, right click and select properties.
  3. Select the Networking tab and click Internet Protocol Version 4 (TCP/IPv4), and then click Properties.
  4. Click Advanced and select the DNS tab. If there are any DNS server IP addresses listed there, write them down for future reference, and remove them from this window.
  5. Click OK.
  6. Select Use the following DNS server addresses. If there are any IP addresses listed in the Preferred DNS server or Alternate DNS server, write them down for future reference.
  7. Replace those addresses with the IP addresses of the Google DNS servers: 8.8.8.8 and 8.8.4.4.
  8. Restart the connection you selected in step 3.

Configure Google Open DNS in your router

Steps involved in changing the DNS settings of router differs by it’s manufacturer. So don’t get surprised if you don’t see these similar settings in your router.

The one I’m currently using is the NETGEAR wireless G 54 router (WGR614).

Enter the IP address of your routers admin console. For me, it’s http://192.168.1.1/

Login with your username and password. (default would be admin/password)

Now click the Basic Settings tab on the left hand side.

google public dns wireless router

Then scroll down to Domain Name Server (DNS) Address. And select Choose these DNS servers.

Replace those address fields with Google IP addresses: 8.8.8.8 and 8.8.4.4.

dns address router google public dns

Click Apply and then Test the new settings.

How to Test whether Google Public DNS is working or not.

For checking whether Google public dns is working or not, after saving the settings mentioned above do the following procedure. Enter a site address in your browser, for eg. www.google.com and check whether the Google homepage is loading or not. If it’s loading, then bookmark this page and try acessing google from bookmark. If that works, the Google public DNS is configured successfully on your system.

If Google homepage doesn’t load, then enter an ip address like http://18.62.1.6/ and check whether it goes to the website http://eecs.mit.edu. If that page loads then you are having problems configuring Google Public DNS. Roll back the changes and check for any website, if it still doesn’t load check your internet connection.

What is the advantage of using Google Public DNS settings?

The first and foremost thing which Google claims is browsing SPEED. Google Public DNS implements prefetching: before the TTL on a record expires and thereby increase DNS response.

More Security by preventing DNS spoofing attacks.

Get the Valid Website content.

  • No Content Blocking
  • No Redirection of invalid pages(as in case of OpenDNS)
  • No Filtering

What is the Advantage ‘FOR’ Google in this free business.

Being the largest online advertising and redirection company, DNS business means much more control over user data, and might be as an option to sneak into competitors business data. More user data means more relevant ads, and hence more revenue for Google. Their privacy policy says that the collected data includes IP address (up to 48 hours, to detect malicious behavior against the service), ISP information and geographic information (2 weeks each). Also they say that the data will not be connected in any way with Google accounts.

So do checkout this new Public DNS service by Google, review any increase in browsing speed and post your comments below. I’d love to hear them.

Download Bluetooth Drivers for Windows 7, Vista and XP [Free]


free-bluetooth-driver-for-windows After upgrading your PC from Windows XP to windows vista or Windows 7, you might sometimes find trouble detecting the bluetooth hardware device installed on your laptop due to missing bluetooth driver. This bluetooth problem could be easily solved by installing the correct version of bluetooth driver either from the manufacturer’s CD or from your personal driver backup. But if you’re without a bluetooth driver CD or forgot to create a backup, then a software called Bluetooth Driver Installer might come handy.

Normally users doesn’t experience any Bluetooth problem after installing Windows 7 because it supports all major kinds of hardware. But incase you find trouble installing Bluetooth driver on Windows 7 or Vista/XP, make sure you try this free bluetooth application first before going to the service centre.

Related: Make Calls From Computer using Mobile bluetooth

Bluetooth Driver Installer Software for Windows 7, Vista and XP

Bluetooth driver installer is a freeware utility which tries to install generic Microsoft driver for your Bluetooth adapter. Another feature of this bluetooth software is that, it creates a restore point automatically so that if anything goes wrong you could easily revert the changes made to your system.

bluetooth driver for windows

How to install the bluetooth driver

First of all, uninstall all the existing blueooth driver [only if have done]

Then restart the system and Run the Blueoothdriverinstaller.exe file which you can download from the link given at the end of post.

Follow the installation wizard and successfully install the bluetooth driver.

install blueooth

Download Bluetooth Driver Installer Software Free

[Supports Windows7, Vista and XP] [Download Free]

Free Download PDF Password Remover With Original license

Free Download anybizsoft PDF Password Remover PDF files could be password locked to restrict others from opening and having access to the sensitive information contained in that document. But it can also happen that you forget the password of the pdf file backed up some months ago. So how can you remove password protection from Adobe PDF files without knowing the actual secret password ? Are there any free PDF password remover softwares ?

A software called PDF Password Remover can do this job for you. AnyBizSoft PDF Password Remover is designed to remove the password and restrictions (Owner Password) of PDF files. They are running a promotional offer in this holiday season which allows you to get the license code of PDF password remover absolutely free.

Features of PDF password Remover from AnyBizsoft

Recovers passwords locked pdf files

PDF password remover from aybizsoft removes both user and owner passwords.

Batch unlocking of pdf files

Supports Adobe PDF 1.0 - 1.7 formats (.pdf)

Standalone, doesn’t need Adobe Reader or Acrobat to be installed

features of anybizsoft pdf password remover

Free Download PDF Password Remover Full version with license/ serial code

Visit the promotional page of AnyBizSoft PDF Password Remover.

Download the PDF password remover and install in it your PC.

Get free license key code by typing in your first name, last name and email address in the promo page.

license key pdf remover

After installing the pdf password remover software, key in the license code you’ve got in your email and enjoy the full version of AnyBizSoft PDF Password Remover absolutely free.

free download pdf password remover license

Download Direct link

Free Mobile Video Chat For Symbian Phones


mobile video chat sis symbian free download imiChat, an instant communication application brings free video chat on mobile phones, and PC’s. This freeware application allows free mobile to mobile video chat and also mobile to pc video chat with other users live on the imchat system.

The only requirement of Imichat is symbian phone with a mobile network connection. The video quality is somewhat average, and we can’t expect to have a hq video quality on a mobile internet connection. This mobile video chat software currently works only with symbian phones.

mobile video chat symbian mobile to mobile video chat free

Features of imiChat : Mobile Video Chat application

Free video calling software for mobile and PC

Works on Symbian phones

Option to switch Rear and Front cameras

Could be used to make free PC to phone calls and pc to phone video chats.

Should have either GPRS, 3G, Wifi Network connection.

How to Video chat using Mobile with Imichat

Download the free application for mobile from the imichat website.

Register and login to live video chat with your friends on mobile.

To turn video on or off, after launching imiChat, change ′Video Chat Settings′ in ′Settings′. During chatting, press ′ 1′ to turn on and off video and key ′ 2′ to switch between front and back cameras.

* Mobile video chat uses a lot of bandwidth, so it’s better to use this application if you’re having a unlimited data transfer plan.

Supported phones : Symbian · S60 V5, S60 V3, S60 V2

Latest supported models are Nokia N96 , , N95 8GB , N95 , N93i , N93 , N92 , N91 , N91 8G , N85 , N83 , N82 , N81 , N81 8G , N80 , N77 , N76 , N75 , N73 , N71 , E90C , E71 , E70 , E65 , E63 , E62 , E61 , E61i , E60 , E51 , E50 , 6290 , 6220c , 6210s , 6120 , 6120c , 6110n , 5700xm , 5320xm , 3250 SGH-i560 SGH-i550 SGH-i450 SGH-i408

Free Download Norton 360 v3.0 with Original License Key


free download norton 360 v3.0 license Norton 360 v3.0 an award winning security brand offers the most comprehensive protection to users and is one of the fastest and lightest allinone solution for protecting your PC and online activities. Also unlike other Norton products, Norton 360 version 3.0 uses fewer system resources and doesn’t slow down the whole system. Download Norton 360 v3.0 with original license key for free.

Norton 360 provides protects against viruses, worms, hackers, firewall, botnets, safeguards against online identity theft, protects important files, and help keep PC tuned and running at peak performance.

norton 360 3.0 software

Features of Norton 360 v3.0

Protection against viruses, worms, hackers, and botnets.

Startup time is less than 1 minute.

Scans take less than 3 minutes.

It uses less than 10 MB of memory.

Norton Pulse Updates deliver up-to-the-minute protection against new threats every 5 to 15 minutes.

Smart Startup Manager turns off unnecessary programs to accelerate PC startup time.

norton 360 startup manager

Other new features of Norton 360 version v3.0 is the Norton safe web, botnet protection, password manager, browser protection, norotn pulse updates and automated backup and restore capability

Optional anti-spam and parental controls

Download Norton 360 v3.0 Full version with Original 3 months license subscription.

Normally, Norton 360 v3.0 costs around $80 for three household PC’s when bought through Norton store. But it’s now possible to download norton 360 v 3.0 for free with 3 months original license activation key. This is a legitimate copy of Norton 360 version 3 and is downloadable as a OEM based setup installer. Hence no activation key or serial code of Norton 360 v3.0 is required.

Go to this Download page and hit the Try for 90 days button.

norton 360 v3.0 download free license

Operating Systems Supported
  • Microsoft® Windows® XP (32-bit) with Service Pack 2 or later Home/Professional/Media Center
  • Microsoft® Windows Vista® (32-bit and 64-bit) Starter/Home Basic/Home Premium/Business /Ultimate
  • Microsoft® Windows® 7 (32-bit and 64-bit) Starter/ Home Basic/Home Premium/Professional/Ultimate***

Or use this Norton 360 v3.0 Direct link for download the setup file.

Norton 360 version 3.0 with Free 3 Months License :N360v3_Build_EN_OEM_Microsoft.exe

Related: Download Norton 2009 , Norton Antivirus 2010

Free Download Norton Ghost 15 Full Version [Ghost v15.0 Review]


free norton ghost 15 download license Symantec has recently released the latest and final version of Norton Ghost 15.0, a backup and recovery software, which is now compatible with Windows 7 and provides support for blueray discs. Norton Ghost 15 includes advanced capabilities and backup/restore options for personal computers.Checkout our review and download Norton Ghost 15 free from the links provided.

What’s New in Norton Ghost v 15

With Norton Ghost, you can create an exact copy of hard drives and also transfer them to other external hard drives with ease. With the hot backup feature, the users doesn’t even need to shut down their computer while backing up.

norton ghost v15 CD download

Another great feature of Symantec Norton Ghost 15 is Cold Imaging technology, by which you could backup a ‘fresh pc’ without even installing the norton ghost product. This feature is very much helpful to restore a newly bought PC to the exactly same factory condition even after many months of usage. This imaging technique in Norton Ghost 15 is by booting the PC to the recovery state from Norton ghost 15.0 boot CD and then starting the backup.

norton ghost 15.0 backup

The ability of Norton ghost 15 to create images from the Recovery CD is enough worth to upgrade from previous version Norton ghost 14. Also you can now create customized recovery CD’s. Download Norton Ghost 15 free from the official web site.

In the occurrence of system failure, Norton Ghost could be used to recover lost or damaged files even if the Operating system does not start. It works with most storage devices, both 25G and 50G Blu-ray Discs including external hard disks, networked drives, and record/rewritable CDs and DVDs.

Main Features of Norton Ghost 15.0

Creates Full Backup including system and file backups.

Ability to restore the PC incase of system failures.

Secure offsite backups through FTP or networked storage devices.

Backup according to schedules and events

Cold Imaging to backup system without installing norton ghost.

Backup hard disks to blueray disks [25GB or 50GB]

Windows 7 support in Norton Ghost 15.0

Incremental and differential backup allows you to Backup only files that have changed.

Support for Bitlocker to enhance security by drive encryption and integrity checking have been included in latest Symantec Norton Ghost.

norton-ghost-15-boot cd-free

Norton Ghost v15 Minimum System Requirements

Operating System:

Windows 7 Starter / Home Basic / Home Premium / Professional / Enterprise / Ultimate
Windows Vista Home Basic / Home Premium / Business / Ultimate
Windows XP Home / Professional

300 MHz or faster processor,512 MB (1GB recommended) of RAM and 430 MB of available hard disk space for installing Norton Ghost v15.0

Download Norton Ghost 15.0 free

Free Norton Ghost 15 Direct Download Link [120MB

Thursday, December 10, 2009

டாஷ் போர்ட் ஐட்டம்ஸ்

டாஷ்போர்டு லிங்கை க்ளிக் செய்த உடன் கிழே காணும் பக்கம் தோன்றும். இனி ஒவ்வொரு முறை நீங்கள் log on செய்ததும், இந்த பக்கத்துக்குள் தான் முதலில் போவீர்கள்.


மேலே இருக்கும் படத்தைப் பாருங்கள். இதில் இடது புறம் இருப்பது தான் உங்கள் ப்ரொஃபைல். அதில் உங்களுக்கு விருப்பமான போட்டோ இணைத்துக் கொள்ளலாம். அதில் உங்களைப் பற்றிய விஷயங்களைப் போட்டு வைத்துக் கொள்ளலாம்.


வலது புற மூலையில் பாருங்கள். create blog என்ற லிங்க். உள்ளது அதில் சென்று நீங்கள் உங்களுக்கென்று வெவ்வேறு தலைப்புகளில் எத்தணை blog வேண்டுமானாலும் உருவாக்கிக் கொள்ளலாம்.


கீழே பாருங்கள், flowers என்று இருப்பது தான் உங்க blog க்கு நீங்கள் ஏற்கனவே கொடுத்த டைட்டில். அதன் கீழே இருக்கும் new post என்பதை க்ளிக் செய்து எப்போ வேண்டுமானாலும் நீங்கள் புதிதாக போஸ்ட் செய்யலாம்.


மொத்தம் 4 tab நீங்கள் எல்லா இடத்திலும் பார்க்கலாம். அது, posts, settings, layout, view blog என்பதாகும். இதில் view blog அழுத்தினால், நம்ம blog திறக்கும். settings அட்வான்ஸுடு ஆப்ஷன். அதனால், இப்போதைக்கு அதை விட்டு விடலாம். போஸ்டிங் ஏற்கனவே நாம் பார்த்தாயிற்று. அடுத்து நாம் பார்க்கப் போவது layout. லே அவுட் பற்றி கண்டிப்பாக எல்லாரும் தெரிந்து கொள்ள வேண்டும்.


இப்போ நீங்கள் லே அவுட் க்ளிக் செய்யுங்கள். கீழ்கண்ட பக்கம் விரியும்.


இடது புறம் மேலே பாருங்கள். page elaments, fonts and colours, edit html, pick new template என 4 tabs இருக்கும். இதில் fonts and colours க்ளிக் செய்து நாம் நம் ப்ளாகின் கலர் மற்றும் fonts ஐ மாற்றிக் கொள்ளலாம். edit html என்பதை விட்டு விடுங்கள். அது அட்வான்ஸுடு ஆப்ஷன். நமக்கு தேவை இல்லை. pick new template ல் போய் நாம் நம் ப்ளாகின் தோற்றத்தை மாற்றிக் கொள்ளலாம். அதனால், நம் ப்ளாகில் இருக்கும் posts எதுவும் அழியாது. அப்படியே புது template ல் வந்து விடும்.

அடுத்து முக்கியமான விஷயம் page elements. இது நம் blog ன் தோற்றத்தின் புளூ பிரிண்ட் என்று வைத்துக் கொள்ளலாம். பாருங்கள் flowers(header) என்பதற்கு கீழே இருக்கும், edit ஐ க்ளிக் செய்து நாம் தலைப்பை மாற்றிக் கொள்ளலாம். அது போல blog posts என்பதற்கு கீழே இருக்கும் edit ஐ க்ளிக் செய்து நமக்கு வேண்டும் விஷயங்கள் அதில் தோன்றும் படி செய்யலாம்.

About Me, Followers, Blog Archieve போன்றவை அதில் default ஆக இருக்கும். அது வேண்டாமென்றால், அதன் கீழே இருக்கும் edit க்ளிக் பண்ணி remove கொடுத்து விடலாம், அல்லது நாம் விரும்பிய மாற்றங்கள் செய்து கொள்ளலாம்.

ஒரு முறை remove கொடுத்து விட்டால், எப்படி மீண்டும் வரவழைப்பது? அதற்குத் தான் add a gadget இருக்கிறது. add a gadget க்ளிக் செய்தால் இது போன்ற பல items இருக்கும். அதில் தேவையானதை அதிலுள்ள + குறி அழுத்தி எடுத்து நம் ப்ளாகில் போட்டுக் கொள்ளலாம்.

நாம் போட்டுக் கொண்டவற்றை, அப்படியே, click and drag செய்தால், நகரும், நாம் வேண்டும் இடத்தில் வைத்துக் கொள்ளலாம்.

ஆயிற்று அவ்ளோ தான். நீங்க ப்ளாக் தொடங்கியாச்சு. successful blogger ஆக என் வாழ்த்துக்கள்.

இனி அடுத்து advanced blogging tips மற்றும் ப்ளாகின் மூலம் எப்படி சம்பாதிப்பது என்றும் சொல்லித் தருகிறேன். (இப்பவல்ல, அதற்கு ஒரு மாதம் ஆகும், அதற்குள் உங்க ப்ளாகை நன்றாக டெவெலப் செய்து வைத்திருங்கள்.)

ஆக்கம்: SUMAZLA/சுமஜ்லா

http://oneasyblog.blogspot.com

டெம்ப்ளேட் மற்றும் போஸ்டிங்

அடுத்த பக்கம் கீழ்கண்டவாறு இருக்கும்.
templates - அதாவது உங்க ப்ளாகின் தோற்றம். scroll செய்தால் நிறைய மாடல் வரும். அதில் எதாவது ஒன்று தேர்ந்தெடுத்துக் கொள்ளுங்கள். பிறகு, எப்போ வேண்டுமானாலும், நம்ம ப்ளாக் டெம்ப்ளேட்டை மாற்றிக் கொள்ளலாம். அதனால், ப்ளாகில் உள்ள எந்த பதிவும் அழியாது. அது அப்படியே புது template ல் வந்து விடும். இப்ப கண்டினியூ பட்டனை அழுத்துங்கள்.
மேலே தெரியும் பக்கம் வந்தவுடன், உங்களுக்கு நீங்களே கை கொடுத்துக் கொள்ளுங்கள். ஆம் நீங்கள் வெற்றிகரமாக உங்களுக்கென ஒரு வலைப்பூ உருவாக்கி விட்டீர்கள். ஆனால், இதோடு வேலை முடியாது. உங்க ப்ளாக் காலியா இருக்கே! அதில் எதாவது போடணுமே?! பூக்களைப் பற்றி நாம் ப்ளாக் போடப் போகிறோமல்லவா, எனவே அதில் தோட்டக் கலை, பூக்களின் பயன்கள், பூக்களின் அழகான புகைப் படங்கள் போன்றவற்றை அதில் போட்டுக் கொள்ளலாம். ஆனால் போடும் தகவல்கள், வேறு தளங்களிலிருந்து காப்பி செய்யப் பட்டதாக இருக்கக் கூடாது. படிப்பவர்கள் விரும்பிப் படிக்கும் விதத்தில் சுவாரஸ்யமாக இருக்க வேண்டும்.


சரி நாம் போஸ்டிங் ஆரம்பிப்போம். start blogging என்ற ரெட் பட்டனை க்ளிக் செய்யுங்கள். இப்போ கீழே உள்ள பக்கம் திறக்கும்.


இப்போ பாருங்க, மேலே posting, settings, layout, view blog என்று 4 tab இருக்கு. அதுல நாம இருக்கிறது போஸ்டிங் tab கீழே.
இப்போ, நாம நம்ம போஸ்டுக்கு ஒரு தலைப்பு கொடுக்கணும். இதில “டெம்ப்ளேட் மற்றும் போஸ்டிங்” என்று இருக்கே, அது மாதிரி. இனி வரும் எல்லா விஷயங்களையும் வேண்டும் போது மாற்றிக் கொள்ளலாம். அதனால கவலைப் படாம டக்குனு ஒரு தலைப்பு கொடுங்க. அப்புறம் கீழே நீங்க சொல்ல விரும்பும் விஷயத்தை டைப் செய்யுங்க. அது தான் உங்க போஸ்ட். அதுல font, alignment, insert picture என வழக்கமான ஆப்ஷன்ஸ் நிறைய இருக்கு. அதெல்லாம் பின்னாடி மெதுவா ஒவ்வொன்னா கத்துக்கலாம்.

இப்போ உங்க போஸ்ட்ட டைப் செய்தொன்ன, கீழே அதென்ன லேபிள்னு இருக்குனு குழம்பறீங்க்ளா?! அதை அப்படியே ப்ளாங்கா விட்டுடுங்க. அது தேவை இல்லை. அடுத்ததா advanced blogging என்று ஒரு கட்டுரை தரப் போறேன். அதில அதைப் பற்றி விளக்கமா தருகிறேன்.

இப்ப கீழே உள்ள பப்ளிஷ் போஸ்ட் என்ற சிவப்பு பட்டனை க்ளிக் பண்ணுங்க. அவ்வளவு தான் உங்க போஸ்ட் பப்ளிஷ் ஆகிவிட்டது. இப்ப இந்த விண்டோ வரும்.

இதில் view blog என்றதை க்ளிக் செய்தால், உங்க ப்ளாக் ஓப்பன் ஆகும். இனி அடுத்த போஸ்ட் பண்ணனும்னா, create new post என்பதை க்ளிக் செய்யுங்கள். அல்லது போஸ்ட்டில் எதாவது மாற்றம் செய்ய வேண்டும் என்றால் edit post கு போங்கள். இந்த படத்தில் மேலே, உங்க ஈமெயில் ஐடிக்கு பக்கத்தில், dashboard என்று இருக்கும். அதை க்ளிக் செய்தால், உங்க blogger ன் முகப்பு வரும். இப்பொ dashboard கு செல்லுங்கள். அடுத்து என்ன என்று அடுத்த் அத்தியாயத்தில் சொல்கிறேன்.

ப்ளாக் உருவாக்குவது எப்படி?

முதலில் http://www.gmail.com/ போய் உங்களுக்கென ஒரு gmail account உருவாக்கிக் கொள்ளுங்கள். ஏற்கனவே ஒரு ஜிமெயில் அக்கவுண்ட் இருந்தாலும், blogging க்கு என புது அக்கவுண்ட் ஒன்று உருவாக்கிக் கொள்வது நல்லது என்பது என் அபிப்பிராயம்.


இப்போ,
http://www.blogger.com/ ஓபன் செய்யுங்க. அதில் கீழ்கண்டவாறு இருக்கும்.

இதில் உங்கள் gmail user id, password கொண்டு லாக் இன் செய்யுங்கள். இப்போ கீழே உள்ள ஸ்கிரீன் வரும்.
இதில் display name என்று இருக்கும் இடத்தில் உங்க பெயரை அல்லது புனைப் பெயரை தரவும். ஒவ்வொரு பக்கத்துக்கு கீழும் இப்பெயர் தான் வரும். (for example, posted by: sumazla). அதன் கீழ் உள்ள செக் பாக்ஸில் டிக் செய்து விட்டு, continue என்ற பட்டனை க்ளிக் செய்யவும். இப்பொழுது, கீழ்கண்டவாறு தோன்றும்.
முதலில் blog title. இதில் உங்க ப்ளாகின் தலைப்பை கொடுக்கவும். ரொம்ப யோசனை செய்து கொண்டு இருக்க வேண்டாம். எப்பொழுது வேண்டுமானாலும் தலைப்பில் மாற்றங்கள் செய்து கொள்ளலாம். உதாரணமாக பூக்களைப் பற்றிய உங்கள் ப்ளாகிற்கு Flowers என்று title கொடுங்கள்.

அடுத்து ப்ளாக் அட்ரெஸ். இது தான் உங்கள் வலைப்பூவின் பெயர். இது ஈமெயில் ஐடி போல, ஒரு முறை கொடுத்து விட்டால் மாற்ற முடியாது. நன்கு யோசித்து நல்ல தலைப்பாக தேர்ந்தெடுங்கள். நான் தேர்ந்தெடுத்த தலைப்பு sumazla. அது எந்த தலைப்பாக இருந்தாலும் அதனுடன் டாட் ப்ளாக்ஸ்பாட் டாட் காம் என்பது சேரும். உதாரணமாக http://sumazla.blogspot.com/. இந்த பெயரை explorer ல் யார் அடித்தாலும் உங்க ப்ளாக் ஓபன் ஆகும்.

ஈமெயில் ஐடி போல பல பெயர்கள் ஏற்கனவே எடுக்கப்பட்டிருக்கும் ஆதலால் அவைலபிலிடி availability செக் பண்ணிக்கோங்க. முடிந்ததா, இப்ப continue பட்டனை க்ளிக் பண்ணுங்க. மீதி அடுத்த அத்தியாயத்தில்.

Tuesday, December 8, 2009

ப்ளாக் என்றால் என்ன?

முதலில் ப்ளாக் (blog) என்றால் என்ன? என்று தெரிந்து கொள்ள வேண்டும். இதோ நீங்கள் படித்துக் கொண்டிருக்கிறீர்களே, அது தான் ப்ளாக். வேண்டுமானால் இலவச வெப்சைட் என்று வைத்துக் கொள்ளலாம். ப்ளாகிற்கு தமிழில் வலைப்பூ என்பார்கள்.

யார் வேண்டுமானால், ப்ளாக் தொடங்கலாம். அதில் உங்களுக்கு தேவையான எல்லா விஷயங்களையும் படங்களையும் போட்டு வைத்துக் கொள்ளலாம். உலகம் முழுவதும் இருந்து மற்றவர்கள் அதைப் பார்க்க முடியும்.

ப்ளாக் தொடங்குவது மிக எளிது. பணம் எதுவும் செலுத்தத் தேவையில்லை. ஜிமெயில் (gmail.com ) உங்களுக்கு இலவசமாக அதைத் தருகிறது. பெரிய அளவில் computer knowledge ம் தேவை இல்லை. பேஸிக் கம்ப்யூட்டர் அறிவுடன், கொஞ்சம் கற்பனைத் திறனும் இருந்தால் போதும்.

முதலில் ப்ளாக் தொடங்கும் முன், எதற்காக ப்ளாக் தொடங்குகிறீர்கள்; அதில் என்ன போடுகிறீர்கள் என்று ஒரு லே அவுட் போட்டுக் கொள்ளனும். தமிழிலா, ஆங்கிலத்திலா என்று முடிவு செய்து கொண்டு, தமிழில் என்றால் அதற்கான typing software install செய்து கொள்ளுங்கள்.

உதாரணமாக உங்கள் ப்ளாகில் பூக்களைப் பற்றி எழுதப் போகிறீர்கள் என்று வைத்துக் கொள்வோம். அதற்கு ஒரு அவுட் லைன் போட்டுக் கொள்ளுங்கள். ப்ளாக் உருவாக்க நீங்கள் ரெடி. எப்படி உருவாக்குவது என்று அடுத்த அத்தியாயத்தில் பார்க்கலாம்.

-சுமஜ்லா

Monday, December 7, 2009

தமிழ் வலைப்பதிவர் உதவிப்பக்கம்

அனைத்து பதிவர்களுக்கும் வாசக நெஞ்சங்களுக்கும் எனது வணக்கங்கள்
" தமிழ் வலைப்பதிவர் உதவிப்பக்கம் " என்ற இணையதளம் தமிழ் வலைப்திவர்களுக்காக 08 -12 -2009 அன்று தொடங்கப்பட்டது இந்த வலைதளத்தில் தமிழ் வலைபதிவு உதவி சம்பதமான தகவல்கள் மட்டுமே இங்கு பதியப்படும் என்பதையும் அறியத்தருகிறோம் இந்த வலைதளத்தில் பிளாக்கர் அல்லது வோர்ட்பிரஸ் அல்லது வேறு வலைதளங்கள் பற்றியே இங்கு பதிவு எழுதப்படும். தற்பொழுது இந்த வலைத்தளத்திற்கு பதிவர்களை சேர்க்கும் பணி நடைபெறுகிறது இந்த வலைத்தளத்தில் நீங்களும் ஒரு பதிவாளராக சேர விரும்பினால் எனது இமெயில் முகவரிக்கும் உங்கள் பெயரையும் இமெயில் முகவரியையும் அனுப்பிவிடுங்கள் முக்கியமாக ஜிமெயில் வைத்திருப்பவர்களுக்கே இந்த வலைத்தளத்தில் சேர கூகிள் அனுமதியளிக்கும் ஜிமெயில் கணக்கு இல்லாதவர்கள் உங்கள் பதிவுகளை nvallipuram.bloggerhelp.@blogger.com என்ற இமெயில் முகவரியுடகா அனுப்பலாம் முக்கியமாக பதிவுகள் அனைத்தும் தமிழில் எழுதப்படவேண்டும்.இந்த வலைத்தளம் பற்றிய கருத்துக்களை நீங்கள் முன்வைக்கவும்.இந்த வலைதளத்தில் எழுதப்படும் பதிவுகளுக்கு அந்த பதிவாளரே முழுப்பொறுப்பையும் ஏற்க வேண்டும் தயவு செய்து நாகரீகம் அற்ற வார்த்தைகளை தவிர்த்து கொள்ளவும் இந்த வலைத்தளத்தில் கருத்துகள் இடுபவர்கள் அவர்களுடைய கருத்துகளுக்கு அவர்களே பொறுப்பு
எனது இமெயில் முகவரி : nvallipuram@gmail.com
~~ நன்றி ~~

Saturday, December 5, 2009

What is Google Chrome OS?

Google Chrome OS is an open source operating system for people who spend most of their time on the web. It aims to provide users with a fast, simple and secure computing experience. Netbooks running Google Chrome OS will be available to consumers late next year. Sign up below if you'd like to receive news on Google Chrome OS from time to time.https://services.google.com/fb/forms/googlechromeossignup/

Wednesday, December 2, 2009

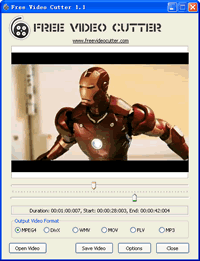
முற்றிலும் மாறுபட்ட Mp3 மற்றும் வீடியோ Cutter

இந்த Cutter Software மற்ற மென்பொருளை விட அதிக பயன்களை
நமக்கு தருகிறது. இது அணைத்து விதமான வீடியோ Format கோப்புகளையும் வெட்டும். நமக்கு விருப்பமான வீடியோ பாடல்கள் மற்றும் நமக்கு பிடித்த வீடியோ பகுதிகளை இதை கொண்டு வெட்டி தனியாக பிரித்து எடுக்க முடியும்.

MPEG 1/2, MPEG4, Divx, Xvid, AVI, WMV, Quicktime MOV, Flash Video முதலிய Format உடைய வீடியோ கோப்புகளை வெட்ட இது Support செய்யும்.

இந்த மென்பொருளை தரவிறக்கம் செய்ய இங்கு கிளிக் செய்யவும்.

PQI நிறுவனத்தின் மிக சிறிய பென் டிரைவ்

PQI நிறுவனம் i810 என்னும் Model-லில் மிக சிறிய பென் டிரைவினை தயாரித்து உள்ளது. இது தான் தற்போது உள்ள உலகின் மிக சிறிய PenDrive ஆகும்.


--------------------------------------------நன்றி----------------------------------------------

Tuesday, November 24, 2009

புகைப்படத்தை உயிரோட்டமுள்ள புகைப்படமாக மாற்ற இணையவழி மென்பொருள்

உங்
கள் புகைப்படங்களை உயிரோட்டமுள்ள (
Sort-of-living)
புகைப்படமாக முப்பரிமாண தோற்றத்தில் (
Sort-of-3D) பார்க்க விரும்புகிறீர்களா? இதோ
அதற்கான
இணைய வழி மென்பொருள். Japanese app என்னும் மென்பொருளி
ல் உ
ங்கள் புகைப்படத்தை தரவேற்றி உ
ங்கள் புகைப்படத்தை உயிரோட்டமுள்ள ஒரு புகைப்படமா
க மாற்
றி அமையுங்
கள். http://labs.mppark.jp/hige/ என்ற இணையதளத்திற்கு சென்று CHANGE எ
ன்பதை அழுத்தி புகைப்படத்தை தரவேற்றி கொள்ளுங்கள்.

அதில் ஏற்கனவே உள்ள புகைப்படம் மாற்றம் பெற்று உங்கள் புகைப்படம் உயிரோட்டமுள்ள புகைப்படமாக மாற்றம் பெறுவதை நீங்கள் காணலாம். அத்துடன் நீங்கள் உங்கள் புகைப்படத்துக்கு அசைவியக்கங்களையும் (Animations) சேர்த்துக்கொள்ள முடியும். சுட்டியின் (mouse) அசைவுகளுக்கு ஏற்ப புகைப்படத்தின் அசைவில் மாற்றங்களை உண்டுபண்ண முடியும்.

Monday, November 23, 2009

அழிக்க முடியாதவாறு கோப்புக்களை (Folders) எவ்வாறு உருவாக்குவது?

முக்கியமான ஆவணங்கள் அடங்கிய கோப்புக்களை (Folders) மற்றவர்கள் அழிக்கமுடியாத வகையில் மிக இலகுவான முறையில் எந்த மென்பொருளின் உதவியுமின்றி உருவாக்கலாம். இத்தகைய கோப்புக்களை (Undeleteable Folders) DOS Command Prompt மூலமாக மட்டும்தான் உருவாக்கமுடியும். அத்தகைய கோப்புக்களை சாதாரணமாக எவரும் அழிக்கமுடியாது. அவ்வாறு அழிப்பதாயின் DOS Command Prompt வழியே சென்றுதான் அழிக்கமுடியும். இதோ அதற்கான வழிமுறைகள். 1. முதலில் DOS Command Prompt ஐ திறவுங்கள்.(Open DOS Command prompt) (Start>Run>(type) 'cmd' )

2. பின்னர் கோப்பு (folder) சேமிக்கவேண்டிய இடத்தினை (C: or D:) தெரிவு செய்த பின்னர் Command Prompt இல் 'md\aux\' என்றவாறு தட்டச்சு செய்யுங்கள்.( கோப்புக்களை உருவாக்க நீங்கள் (aux,lpt1,con,lpt5) போன்ற பெயர்களைமட்டுமே பாவிக்க முடியும்.)

3. தற்பொழுது aux என்ற கோப்பானது (folder) உங்கள் கணனியில் நீங்கள் தெரிவுசெய்த இடத்தில் (directory: C: or D:) சேமிக்கப்பட்டிருக்கும்.

4. தற்பொழுது அந்த கோப்பினை அழிக்க முயற்சி செய்து பாருங்கள். அது கீழே உள்ளவாறான தகவலை உங்களுக்கு தரும்( Error Message).

5. இத்தகைய கோப்புகளை உருவாக்குவதற்கான பிற பெயர்கள். ( நீங்கள் கோப்புக்களை உருவாக்க வேண்டுமாயின் இத்தகைய பெயர்களையே பாவிக்க வேண்டும்.) lpt1 (உதாரணம்: md\lpt1\),CON,lpt5,ஆக்ஸ்

6. கோப்பை அழிக்க வேண்டுமாயின் rd\aux\ என்றவாறுதட்டச்சு செய்யுங்கள்.

எங்கே நீங்களும் ஒரு முறை முயற்சி செய்து பாருங்கள்.

கணனியில் விரைவாக கோப்புக்களை (Folders) திறப்பதற்கான வழிமுறை

உங்கள் கணனியில் கோப்புறைகளை (Folders) திறக்க அதிக நேரம் எடுக்கின்றதா? இதற்கு காரணம் உங்கள் கணனியின் இயங்குதளமானது (operating system) உங்கள் கணனியில் இணைக்கப்பட்டுள்ள வலையமைப்பு ஆவணங்கள் மற்றும் அச்சியந்திர இணைப்புக்களை ( Network files and printers) தானாகவே தேடி கண்டுபிடிக்க நேரம் செலவாகுதலாகும். இவற்றினை நிறுத்தி மிக விரைவாக கோப்புகளை(Folders) திறப்பதற்கான வழிமுறைகள் இதோ.. 1. முதலில் My Computer ஐ திறவுங்கள்.( open My Computer) 2. Tools Menu வில் அழுத்துங்கள். 3. Tools menu வில் Folder option என்பதினை அழுத்துங்கள். 4. View Tab என்பதினை தெரிவு செய்யுங்கள். 5. Automatically search for network folders and printers என்பது தெரிவு செய்யப்பட்டிருந்தால் அதனை நீக்கி விடுங்கள். 6. Apply செய்து OK பண்ணுங்கள். இப்பொழுது உங்கள் கணனியில் நீங்கள் விரைவாக கோப்புறைகளை திறக்க கூடியதாக இருக்கும்.